

Genesis
Lesson: Creation
Hands-on Activity for Lesson Reinforcement: Creation Cube
I saw a similar cube on Pinterest and thought I could use that same idea and add my twist to it, so this is what I came up with. This cube can be easily made to help the children understand creation and the various things that were created on each day.
Begin by using square Kleenex box or a Styrofoam cube or any type of box that has 6 sides and a roll of wrapping paper to cover the cube with. I used just plain white wrapping paper.. Wrap it like a present.


Next, add the numbers 1-6 to the cube, one number for each side of the cube.

Day 1: Light
I then used scrapbook paper to have some added interest on each side. You can look through the sides and see what I've added to the "backgrounds". After that, almost all of the added objects were stickers that I found at Hobby Lobby. I thought these would be easy for the kids to apply in class. I went ahead before class and placed all of the stickers that each student would need for their Creation Cube in a Ziploc baggie. It was easier for me to separate the stickers and give each child a set of stickers instead of trying to hand those out in class. Then during class, the kids added the stickers as we covered each day of creation. (You may need to add a few things to the cube before class time, depending on how much class time you have to work with.)I had approximately 30 minutes to complete this project and it took every bit of the 30 minutes. I used this as my teaching tool going over each day of creation as we added the stickers for that day.

Creation Cubes prepared and waiting for Bible Class time! My completed one, the example is on the bottom row in the center.

Day 2: The heavens

Day 3: The plants, and flowers and trees

Day 4: The sun, and moon and stars

Day 5: The fish and birds

Day 6: The animals, Adam and Eve

My K-1 Bible Class kids working on their Creation Cubes in Class.

The finished project: Creation Cubes
Just an FYI... I must say, I was really pleased. After completing the backgrounds and numbers on mine, I covered it with clear packing tape to protect it. (You might not be able to tell in this photo, but mine has a shiny appearance.) I also put a strip of packing tape where each side meets on the kid's cubes. I thought that this would be the most likely place for the wrapping paper and backgrounds to tear or pull away.

Creation cube covered with packing tape to protect it.
We usually sing a little song that goes with the Creation. The tune is: Oh Be Careful Little Eyes What You See. The verses are as follows:
Verse 1: Did you know God made the light, He made the light?
Did you know God made the light, He made the light?
So just look around and see what He's made for you and me,
On day 1 He made the light, He made the light.
Verse 2: Did you know God made the heavens, He made the heavens?
Did you know God made the heavens, He made the heavens?
So just look around and see what He's made for you and me,
On day 2 He made the heavens, He made the heavens.
Verse 3: Plants, and flowers and trees
Verse 4: Sun and moon and stars
Verse 5: Fish and the birds
Verse 6: Animals, Adam and Eve
-------------------------------------------------------------------------------------------------------------------------
Genesis
Lesson: Adam and Eve in the Garden of Eden
Lesson Reinforcement: A visual of the serpent with Bible verse attached.

Supplies Needed: 1 snake per child, brown spray-paint, google eyes, red paper for tongue, large tongue depressors, and the scripture Genesis 3:1-5 mounted on cardstock - 1 per child.
1. Begin by spray painting the unfinished snakes brown. (I purchased my little wooden snakes at Michaels Craft Store for $1 each. I really liked this type of snake because of it's flexibility. I also happened to find the spray paint on clearance at the same store for .79.)

2. Spray paint the wooden snakes.

3. Hot glue google eyes on the snakes and glue the long red tongue in the snake's mouth.

4. Hot glue 3 large tonue depressors together make a T shape.

5. Hot glue the painted snake onto the T shape.


6. Hot glue the scripture associated with the serpent lying to Eve onto the T shape. (I had already typed up the scripture, mounted it onto cardstock and laminated it.) . (Genesis 3:1-5)
------------------------------------------------------------------------------------------------------------------------
Genesis:
Lesson: Cain and Abel
Visuals to help the students understand what type of work that Cain and Abel did.


Hands on Activity
Cain and Abel Stick Figures
I originally saw this on Pinterest. Not original but simple and genius!
Supplies needed: One of each stick figure, Cain and Abel, for each student, glue stick, 1 piece of construction paper per child, one zip lock bag per student
Directions:
1. Make one copy of each stick figure for each student.
2. Place all of the paper body parts in one ziplock bag and give to the student along with a glue stick and a piece of construction paper.
3. Have the children glue the Cain and Abel stick figures to the construction paper placing the correct body, legs, and arm with the correct head.
Alternative: These can also be run onto cardstock, cut out, then laminated. Once laminated and cut out, place a magnet on the back of each piece. The students can "put their Cain and Abel together" by placing each magnetized body part with the correct head a cookie sheet. They can also be taken home and placed on the student's refrigerator.
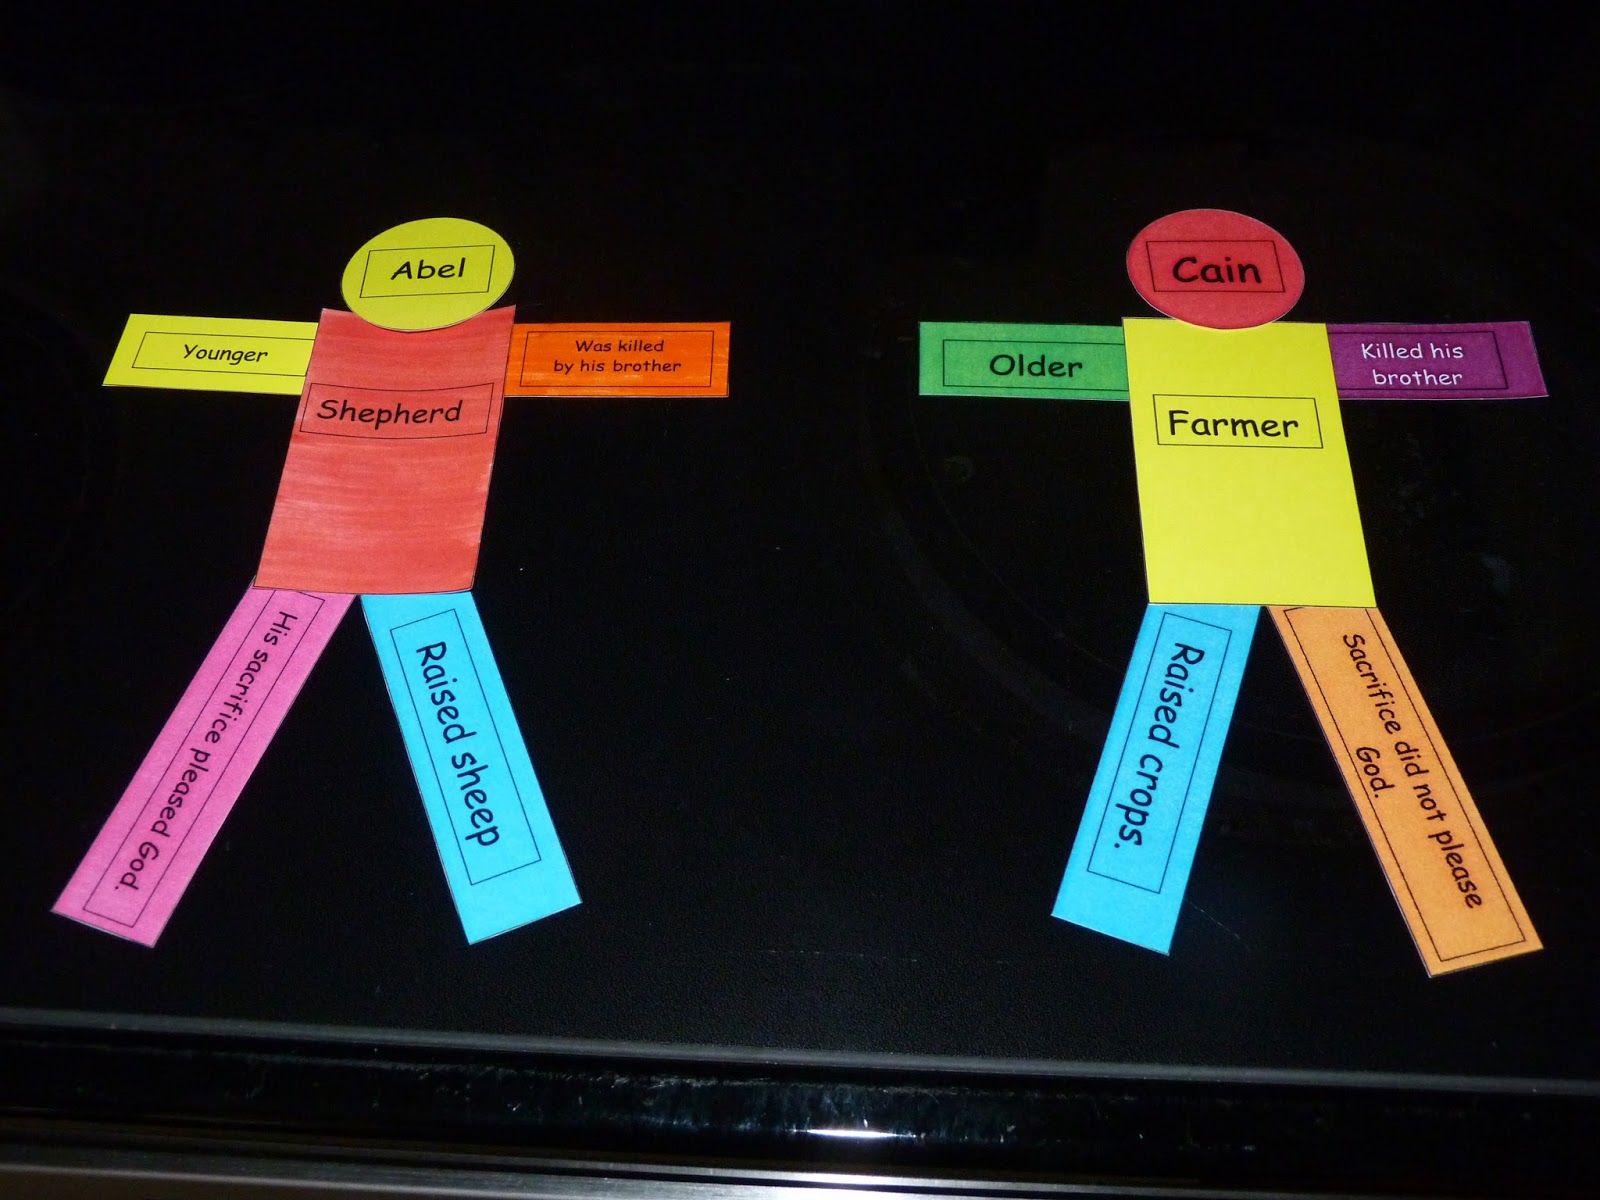

If you have students that are non-readers, these can easily be adapted by using pictures on each body part instead of the. (I used the red head for Cain to symbolize blood/death to help the kids remember that Cain killed Abel. Also, another little thing that I do to help us remember what jobs they each had is to use the word "crops" with Cain. That is a little bit helpful as they both begin with the "K" sound.


-----------------------------------------------------------------------------------------------------------------------
Genesis:
Lesson: Noah and the Ark
"Noah Obey's
God"
Lapbook
Directions: Run one colored
copy of "Noah Obeys God" per child onto white paper. Next cut in half
on the solid horizontal line.


Glue the last box of the first row onto the empty box on the second row. You should now have one long strip of story boxes.


Last of all, fold along all remaining vertical lines. After folding, you will have an Accordion style lap book for the students to take home as a visual reminder of the Bible lesson.


***These can be copied onto white cardstock
for a sturdier version.
-------------------------------------------------------------------------------------------------
-------------------------------------------------------------------------------------------------
Genesis
Lesson: Abraham and Isaac
Visual: Altar

No comments:
Post a Comment